
All About Self-Driving Cars
Self-driving cars, as the name suggests, are cars that can drive themselves. They use sensors and systems to drive the car. How does the car know when to stop, slow down or take turns? The car uses sensors and systems to understand traffic lights, road bumps, people crossing roads, and even vehicles around you.

Self-driving cars have always been a dream but today, but we are slowly starting to see them today. They are helpful in avoiding road accidents or can even help blind people to drive a car. Many cars today are equipped with sensors and advanced systems that alert drivers to avoid dangers. They can be used to travel in dangerous places where it is unsafe for humans to go like toxic areas or even different planets like Mars.
How does AI make them smart?
AI is used for robots to understand their surroundings like people walking, street lamps, pavements, animals, etc. AI helps it to understand that such things need to be avoided so the car can avoid crashes or accidents.
The car can change directions, slow down or even stop until the obstacle is gone. It finds out how far another car is, predicts approaching obstacles like a vehicle or a person crossing the road, and selects the best action like slowing down, stopping, or changing directions. The AI can even suggest the best routes to a destination based on traffic and weather.
Applications
The future of driving belongs to self-driving cars. Here are some of their many useful applications:
- Self-driving cars are used in waste collection bots, delivery bots, farming vehicles like tractors, etc.
- They use sensors to note the vehicle’s location, altitude, rotation, etc. which helps to drive on uneven roads.
- Self-driving cars are used to help while driving the car in reverse.
They are also used to explore new areas like Mars and other planets.
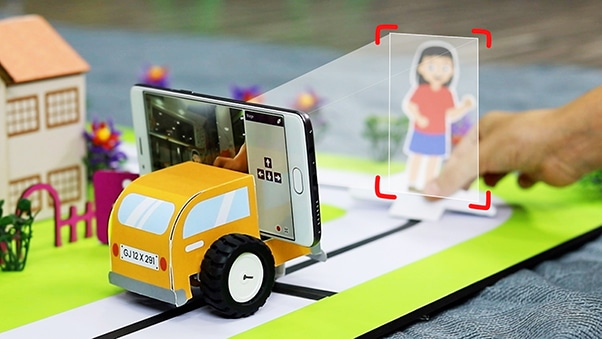
Activity 1: Detecting Signs & Landmarks
Before we jump in to make our self-driving car using Quarky, we must first understand how it will detect signs and landmarks.
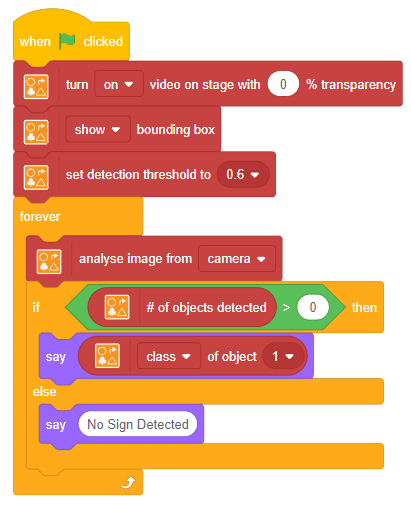
We’ll be using our Smartphone’s camera to detect the numbers. The logic here is pretty simple. We’ll bring a random sign in front of the camera. PictoBlox will detect it and tell us which sign it is.
Coding Steps
Follow the steps below:
- Create a
New filein PictoBlox App. - Connect
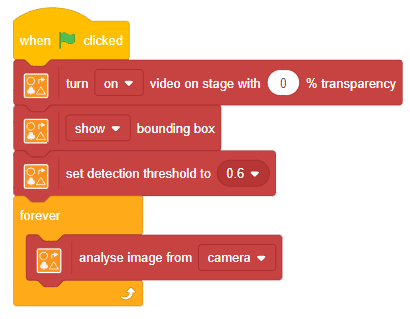
QuarkytoPictoBlox. - Add a when flag clicked block from the
Eventspalette into the scripting area. - Next, tap the purple-colored Add Extension button in the screen’s bottom-left corner. Then, select the
Autonomous Drivingextension to add it to your palette.
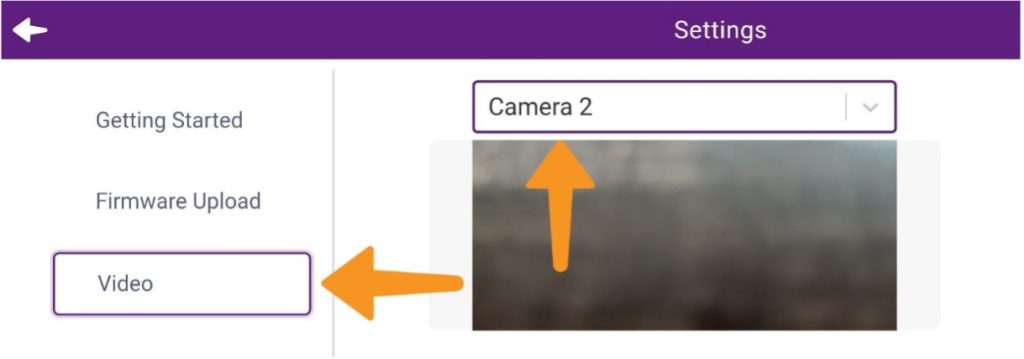
Camera Setting: We would want to use the back camera of the Mobile / Tab.- Click
Setting
- Click on Camera. Then from the dropdown select the Back Camera (Camera 2).

- Click
- Then, add a turn () video on stage with () % transparency block from the
Autonomous Drivingextension and select on flipped from the drop-down. This will turn on the rear camera of your Smartphone. - Add a () bounding box block.
- Next, add a set detection threshold to () We’re going to set it as 0.6.

- Now, from the
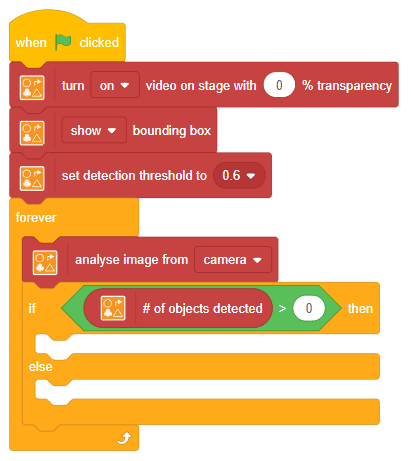
Controlpalette, add a forever block. - Inside the forever block, add an analyse image from () This block will detect and analyze the objects the camera sees.

- Add if-else block from the
Controlpalette. - Add () > () block from the
Operatorpalette in the if Add # of objects detected block from theAutonomous Drivingextension in the first space and 0 in the second space.
- Add a say () block from the
Lookspalette. Place () of object () block in the say () block. - Add another say () block in the else branch and add the message – No Object Detected.

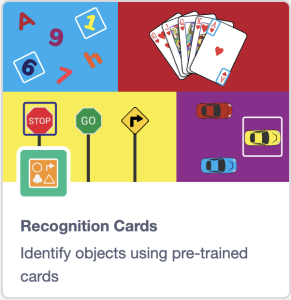
- Now, run the script by clicking the green flag and bring one by one signs and landmarks cards in front of the camera to check whether the script is running perfectly fine.
- Save the file as
Sign Detector.


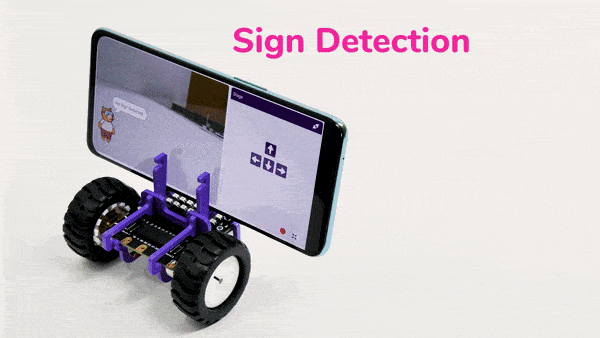
Activity 1: Output
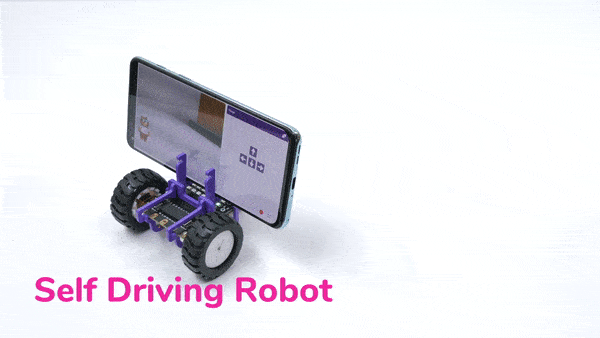
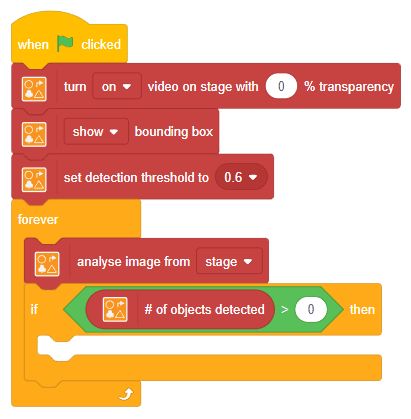
Activity 2: Making a Self-Driving Car
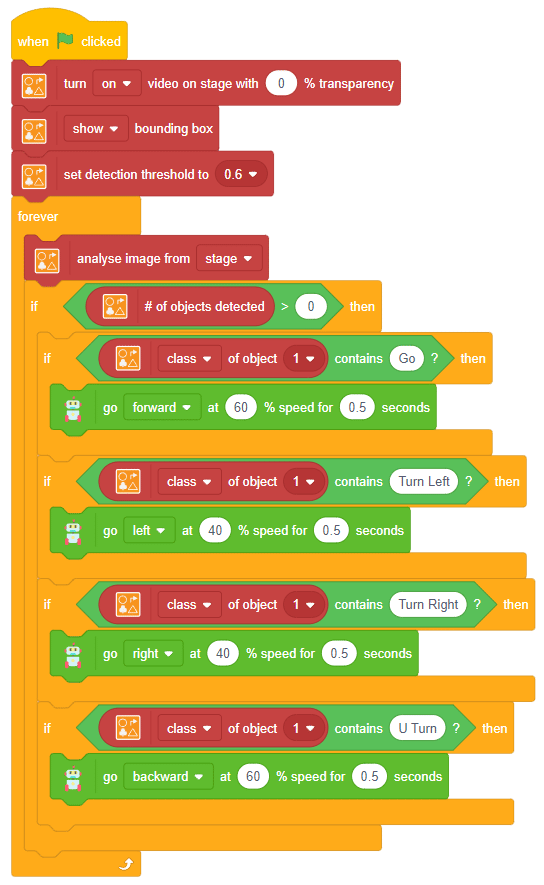
It’s time to write the code for our self-driving car. The car should recognize the signs and landmarks in its path and perform the action accordingly:
- Go Sign – Forward
- Turn Left Sign – Left
- Turn Right Sign – Right
- U-Turn Sign – Backward
Coding Steps
Follow the steps below:
- We will start with the script that we made in the previous activity.
- Replace the if-else block with the if block.
Add the same condition.
- Add the if block inside the if The condition we are going to put – is the object class GO?
- Add () contains ()? block from the
Operatorspalette in the if block condition. - Add the () of object () block from the
Autonomous Drivingextension in the first space of the () contains ()? Select the parameter as a class. In the second space add “Go“. - Add go () at () % speed for () seconds block from the
Robotpalette. Select direction as Forward, speed as 60%, and time as 0.5 seconds.
- Duplicate the if block three times for the following conditions:
- Turn Left – Select direction as Left, speed as 40%, and time as 5 seconds.
- Turn Right – Select direction as Right, speed as 40%, and time as 5 seconds.
- U-Turn – Select direction as Backward, speed as 60%, and time as 5 seconds.

- Click the green flag to run the script. Make your own city by placing the signs and landmarks and then make the car drive on its own.
- Save the file as
Self Driving Car.

Activity 2: Output
Challenge: Handling Multiple Signs
How does a car handle multiple signs?
Well, there are 2 rules you can define:
Set a Priority List: You can make a priority list that helps you define rules for the rules. You can do it easily with the if-else block.Closes First: The robot will follow the closest sign to the robot. In this case, we will have the robot turn right.
Let’s make the script for the second condition- Closes First. For making this project, we have to break it into 2 parts:
- Finding the closest sign.

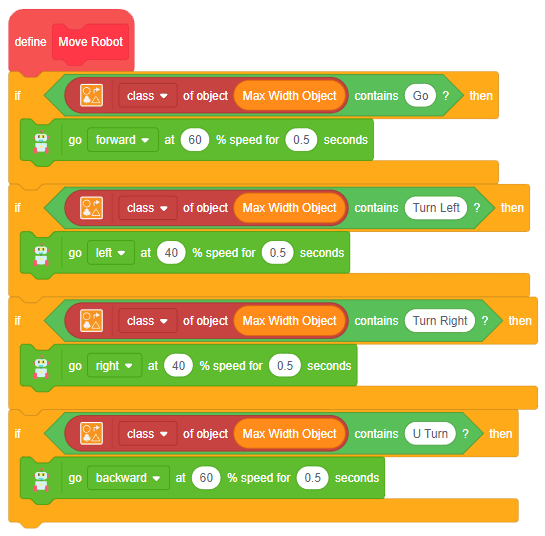
- Making action according to the sign. Create the custom block named Move Robot which makes the robot move according to the sign which has the maximum width.

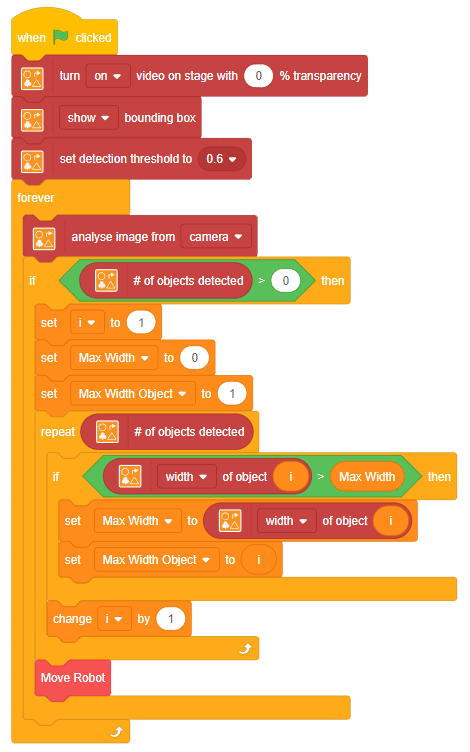
Set the signs and run the script to test it.

Make sure you finish and submit the assignment, as well as take the quiz, before moving on to the next lesson.