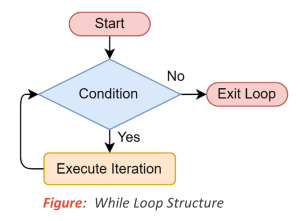
While Loop
The While loop executes a set of commands as long as the condition remains true. While Loops are also known as conditional loops. When the condition is no longer met, the loop concludes.
Example 1: Print numbers from 1 to 15
We can use a While loop to write numbers from 1 to 15. We have a condition to stop when we reach 15. Here’s the pseudocode:
Number = 1
while Number <= 15:
print (Number)
Number = Number + 1
Example 2 – Print a statement 3 times
With a While loop, we can print a statement three times. We repeat the statement until we have printed it three times. Here’s the pseudocode:
Count = 0
while Count < 3:
Count = Count + 1
print(“Hello, friends!”)
Example 3: Print numbers from 9 to 0
To print numbers from 9 to 0, we can use a While loop. We repeat the task until we have printed the number 1. Here’s the pseudocode:
Number = 10
while Number >= 1:
Number = Number – 1
print(Number)
Implementing While Loop in PictoBlox
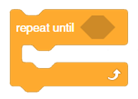
The Repeat Until () block is a Control and C block. Blocks held inside this block will loop until the specified Boolean statement is true. In another case, the code beneath the block (if any) will execute. This loop is similar in nature to a while loop.
Activity 1: Touch Based Piano
You used Quarky’s touch sensors to play sounds in the first lesson. Could you make a mini piano for yourself using them? That is what we’re going to do in this lesson!
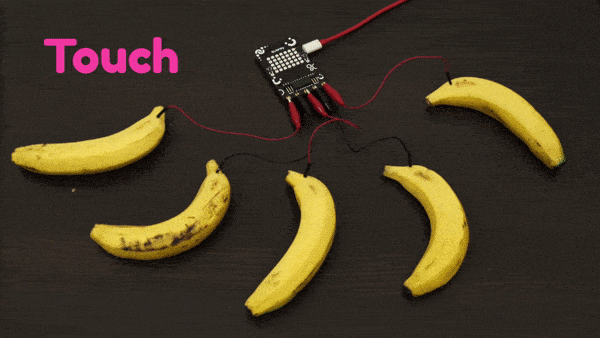
Touch-Based Piano – Overview
Before we begin with our activity, let’s have a look at our touch piano.
As you know, Quarky has 5 touch sensors, i.e. sensors can detect if you’ve touched them.
To detect if you’ve touched a sensor, we have two blocks:
- is () touched ? block: The result of this block will be 0, or False if we’re not touching the sensor. It will be 1, or True if we are touching it.

- when () is touched block: This block starts executing the script when the selected touch pin is touched.


Our touch-based piano will work like this: when we touch a particular sensor, then Quarky will play a note. The note will be different for each sensor.
Sounds cool? Let’s get started then!
Let’s Code!

Follow the steps below to transform Quarky into a melodious piano:
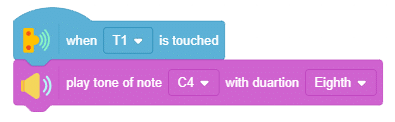
Let’s start with the first touch sensor.
- Go to the Sensors palette and add a when () is touched block into the scripting area. The first sensor, T1, is set as the default option.
- To play sound, go to Speaker palette and add play tone of note () with duration () block below the when () is touched block
 Quarky will play the note C4 if T1 is touched according to the script so far. You can test the script by touching the T1 pin.
 - Repeat steps 1 and 2 for T2, T3, T4, and T5. All you have to do is change the sensor chosen in each when () is touched block and the note in each play tone of note () with duration () block.
Have fun playing your piano!
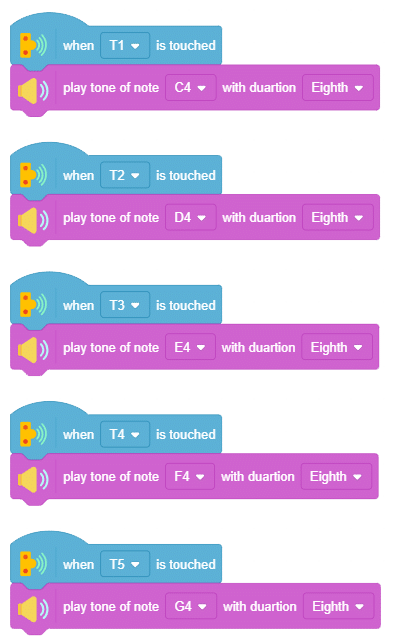
Activity 2: Touch Based Lamp
In this lesson, you will learn about Quarky’s 2 tactile switches.
Quarky has 2 tactile switches or buttons which allow Quarky to take input from the user. You can get the state of the button in PictoBlox using is button () pressed? block. The block reports 1 when the switch is pressed and 0 when the switch is not pressed.
In the forever block, the blocks held inside will be in a loop — just like the repeat () block, except that the loop never ends (unless the stop sign is clicked, the Stop All block is activated, or the stop script block is activated within the loop). Due to this infinite loop, the block has no bump at the bottom; having a bump would bepointless, as the blocks below it would never be activated.
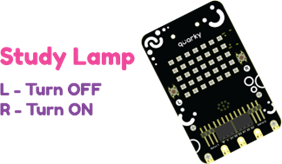
Let’s make a lamp with Quarky. The logic is simple – if we press the left switch, L, the lamp should turn OFF. If we press the right switch, R, the lamp should turn ON.
Follow the steps below:
- Open PictoBlox App, go to My Space, and click on + button to create a new file.
- Connect Quarky to PictoBlox.
- Go to the Sensors palette and add a is button () pressed? block into the scripting area. The button, L, is set as the default
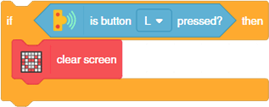
- To check if L is pressed, we’ll use an if Go to the Control palette and drop an if block into the scripting area. Drop the is button () pressed? block in the white space of the if block.
- If L is pressed, then, according to our logic, the LEDs should turn Therefore, go to the Display palette and drop a clear screen block inside the if block.

- However, if R is pressed, then the LED should turn Therefore, add another if block below the first one and drop a is button () pressed? block in the white space.
- Then, go to the Display palette and drop display matrix as () block inside the if block, and set all the LEDs as
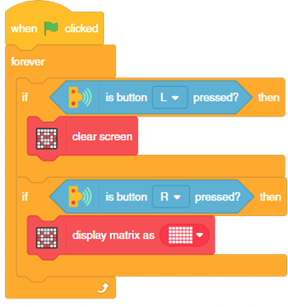
- Add a forever block around the entire
- To add the finishing touch, add a when flag clicked block from the Events palette above the forever
- Finally, click the green flag to run the Press the L switch to turn ON the lights and R to turn OFF the lights.

- Save the file as Lamp.