
Variables
Let’s talk about variables. But before that, let’s have a look at why we need variables.
Why Do You Need Variables?
You’ve thrown a party in which the menu consists of your famous soup and noodles. As your guests relish the soup, you go to the kitchen to ready the noodles. You suddenly realize that you don’t have enough clean bowls to serve the noodles! You grab the dirty ones and clean them quickly. You use the bowls previously used to serve soup to serve the noodles too. Day saved!
What are Variables?
The bowls at the party were used for serving different things. In computer programming terms, they are what are known as variables.
A variable is something that can take or store different values as the program is executed.
Just as the same bowl is used to store different things, a variable is used to store different values such as numbers or words.

Creating a Variable in PictoBlox
Let’s see how you can create a variable in PictoBlox. Follow the steps below:
- Open PictoBlox and create a New File.
- Select the coding environment as Block Coding.
- Open the Variables palette.
- Select Make a Variable.

- A small dialogue box will appear in the center of the screen asking for the variable name; give it any name of your choice.

- Click OK.
That’s it!
Manipulating a Variable Using Blocks
Now, let’s see how to assign values to a variable, change them, etc.
- The set () to () block will set the specified variable to the given value be it a string or number.

- The change () by () block will change the specified variable by a given amount.

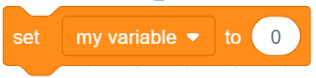

The my variable block simply holds its variable and reports it when the variable is called.
Operators
- Operators are symbols that tell the computer to perform specific mathematical or logical manipulations.There are five main arithmetic operators in PictoBlox:
S No Operator Definition Image 1 Addition Adds values on either side of the operator. 
2 Subtraction Subtracts the right-hand operand from the left-hand operand. 
3 Multiplication Multiplies values on either side of the operator. 
4 Division Divides the left-hand operand by the right-hand operand. 
5 Modulus (Remainder) The modulus operator (%) calculates the remainder when two variables are divided. Please note that this operation can only be performed on an integer. 


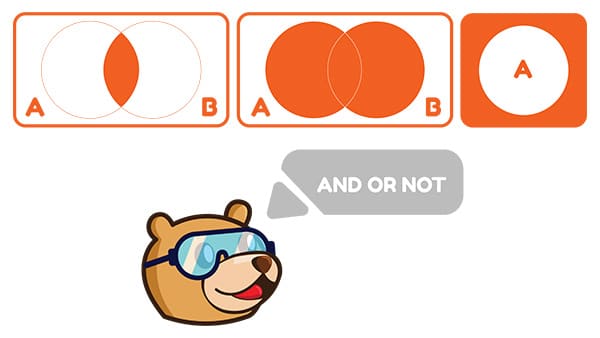
Logical Operators
These operators take boolean values (one of the two possible values) as input and return boolean values as output. They are mostly used when we need to test multiple conditions at once. PictoBlox has three logical operators:
- Logical AND

- Logical OR

- Logical NOT

Logical AND
The () and () (logical AND) block is an Operators block and a Boolean block. The block joins two boolean blocks (blocks that report boolean values) and compares them. If they are both true, the block returns true; if one of them or both are false, then the block returns false. This block is used for checking if two or more conditions are true at the same time.
Logical OR
The () or () (logical OR) block is an Operators block and a Boolean block. The block joins two Boolean blocks and compares them. If at least one of them is true, the block returns true; if neither of them is true, only then does the block return false. This block is used for checking if any of the conditions are true.
Logical NOT
The not () (logical NOT) block is an Operators block and a Boolean block. The block checks if the Boolean block inside it is false. If it is false, the block returns true; if the condition is true, it returns false. This block can be used to “reverse” Booleans.
Conditional Statement
Conditional Statement allow the program to check the conditions by testing a variable against a value and acting accordingly. A program that has conditional statements is called a Conditional Program, and the process is known as Conditional Programming.
Beetle in the Maze
Get ready for an exciting adventure! In this project, we’ll create a fun game where we guide a beetle through a maze to reach a delicious apple. Using PictoBlox, we’ll control the beetle’s movement with the keyboard’s arrow keys while making sure it doesn’t collide with maze boundaries. Let’s help our beetle friend navigate through the maze and reach the apple!
Activity: Beetle in the Maze
In this activity, we are about to create an enthralling game that aims to guide a beetle to an apple at the end of a maze without colliding with the boundaries. We will be steering the beetle using the keyboard’s arrow keys.
In this activity, we are about to create an enthralling game that aims to guide a beetle to an apple at the end of a maze without colliding with the boundaries. We will be steering the beetle using the keyboard’s arrow keys.
Activity 1: Making the Beetle Move
Follow the steps below:
1. Open the PictoBlox and select the coding environment as Block Coding as shown.
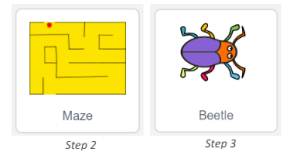
2. Click the Choose a Backdrop button. Select the Maze backdrop from the library.
3. Click the Choose a Sprite button. Select the Beetle sprite from the library.
4. Right-click on the Tobi icon in the sprite palette and delete it. Your stage is all set for coding.
5. Select the Beetle sprite by clicking its icon.
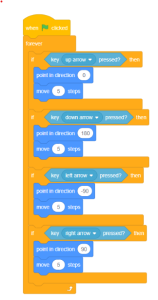
6. Make the following script to make the Beetle move around the stage with the keyboard keys. We are changing the direction of the Beetle to move with ease.
Activity 2: Sensing the Environment
Now, it’s time to write the script for safely taking the beetle to the end of the maze. Follow the steps below to write the script:
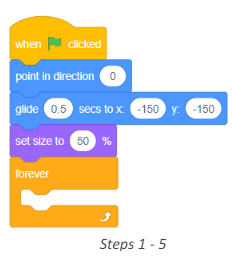
1. Go to the Events palette and add a when flag clicked block in the scripting area.
2. Drag and drop the point in direction () block below the when flag clicked block from the Motion palette.
3. Then, drag and drop a glide () secs to x: () y: () block and set secs as 0.5, x as -150 and y as -150. The x and y values are the beetle’s initial position coordinates.
4. Drag and drop a set size to () % block from the Looks palette to adjust the beetle’s size.
5. Whatever we write next must execute continuously because we want to keep track of whether the beetle touches the boundaries or not. So, drag and drop a forever block.
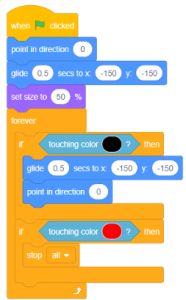
6. Drag and drop an if block inside the forever block and the touching colour ()? block from the Sensing palette inside the space of the if block. This block will help us check if the beetle touches the
boundaries. Select the colour of the boundaries from the drop-down.
7. Whenever the beetle touches any boundary, it should return to its initial position and if it safely reachesthe end, i.e., touches the colour red, the game should stop. For that, we will use the stop () block.
8. Click on the Green Flag and enjoy playing the game.
9. Save the file as Beetle in the Maze.